DIY Baby Shower Cookies: Baker’s Tips for Stunning Designs
Creating homemade baby shower cookies is one of the most rewarding ways to personalize your celebration. Whether you’re hosting an intimate gathering or a large event, decorated sugar cookies add a special touch that store-bought treats simply can’t match. From elegant designs to playful themes, DIY baby shower cookies let you express creativity while impressing your guests with flavors and artistry they’ll remember.
The beauty of making your own cookies lies in the complete control you have over ingredients, flavors, and designs. You can accommodate dietary restrictions, choose premium butter and vanilla, and create custom designs that match your shower’s theme perfectly. Plus, there’s something genuinely heartfelt about serving treats you’ve crafted with your own hands—guests always appreciate the effort and love baked into each cookie.
In this comprehensive guide, we’ll walk you through everything you need to know about creating professional-looking baby shower cookies at home, from essential equipment to advanced decorating techniques.
Table of Contents
- Essential Equipment and Supplies
- Perfect Sugar Cookie Recipe
- Royal Icing and Piping Techniques
- Baby Shower Design Ideas
- Color Coordination and Themes
- Storage and Transport Tips
- Frequently Asked Questions
Essential Equipment and Supplies
Before diving into decorating, you’ll need to gather the right tools. Having quality equipment makes the difference between frustrating results and beautiful cookies that look professionally done. Start with cookie cutters in baby-themed shapes—onesies, pacifiers, baby bottles, strollers, and teddy bears are popular choices. Invest in metal cutters rather than plastic, as they hold their shape better and cut more cleanly through dough.
A stand mixer or hand mixer is invaluable for creaming butter and sugar to the perfect consistency. You’ll also need measuring cups and spoons, a rolling pin (preferably with thickness guides), parchment paper, and baking sheets. For decorating, gather piping bags, various round and specialty tips (sizes 1, 2, 3, and 5 are most versatile), and an offset spatula for spreading icing smoothly.
Additional supplies include a lazy Susan or turntable for rotating cookies while decorating, toothpicks for smoothing icing, edible markers for fine details, and food coloring in gel or powder form (liquid food coloring can make icing too thin). Consider investing in a cookie decorating mat with measurements to ensure consistent sizing.
For storage and transport, you’ll need airtight containers, parchment paper to layer cookies, and a sturdy box for transporting decorated cookies safely. A cooling rack is essential for preventing condensation that can ruin your icing.

Perfect Sugar Cookie Recipe
The foundation of great baby shower cookies is a reliable sugar cookie dough. This recipe yields cookies with the perfect texture for decorating—sturdy enough to hold detailed icing work without cracking, yet tender and flavorful.
Ingredients:
- 2 3/4 cups all-purpose flour
- 1 teaspoon baking soda
- 1/2 teaspoon salt
- 1 cup (2 sticks) unsalted butter, softened
- 1 1/2 cups granulated sugar
- 1 large egg
- 1 tablespoon vanilla extract
- 1/2 teaspoon almond extract (optional but recommended)
Instructions:
- Preheat your oven to 350°F (175°C). Line baking sheets with parchment paper for easy cleanup and consistent baking.
- In a small bowl, whisk together flour, baking soda, and salt. Set aside. This prevents lumps and ensures even distribution of leavening agents.
- In your mixer, cream butter and sugar together for 2-3 minutes until light and fluffy. This step is crucial for tender cookies—don’t skip it. Scrape down the bowl halfway through.
- Add the egg and both extracts, mixing until fully incorporated. The mixture should be smooth and pale.
- Gradually add the flour mixture, mixing on low speed until just combined. Overmixing develops gluten and creates tough cookies.
- Divide dough in half, wrap in plastic wrap, and refrigerate for at least 2 hours. Chilled dough is easier to roll and cut without spreading.
- On a floured surface, roll dough to 1/4-inch thickness. Use your cookie cutters to cut shapes, placing them on prepared baking sheets.
- Bake for 8-10 minutes, until edges are just set but centers are still soft. Cookies continue cooking on the hot pan after removal.
- Cool on baking sheets for 5 minutes, then transfer to wire racks to cool completely before decorating.
This recipe yields approximately 24-30 cookies depending on size. For best results, ensure all ingredients are at room temperature before mixing, and don’t rush the chilling process.
Royal Icing and Piping Techniques
Royal icing is the gold standard for decorating baby shower cookies because it dries hard and creates a professional finish. Unlike buttercream, royal icing won’t smudge or melt, making it ideal for decorated cookies that need to travel or sit out at your event.
Royal Icing Recipe:
- 3 large egg whites (or 2 tablespoons meringue powder mixed with 3 tablespoons water)
- 4 cups powdered sugar, sifted
- 1 teaspoon vanilla extract
- 1/2 teaspoon lemon juice
- Water as needed for consistency
Beat egg whites until foamy, then gradually add powdered sugar, one cup at a time, beating on low speed. Add vanilla and lemon juice. The icing should be smooth and thick enough to hold peaks. For piping details, keep icing thick; for flooding (covering large areas), thin it with a few drops of water until it flows smoothly but still holds its shape.
Piping Techniques:
Start with a basic outline using thick icing and a small round tip. Hold the piping bag at a 45-degree angle, applying steady pressure as you move along the cookie’s edge. This creates a barrier that contains flooding icing and adds dimension.
For flooding, thin your icing to a consistency that flows but doesn’t run off the cookie. Fill a piping bag with a larger tip and gently squeeze icing into the outlined area, using a toothpick to spread it evenly. Work quickly before it dries.
Piping details like dots, lines, and flowers adds personality. Practice on parchment paper first—you’ll be amazed at how quickly your hand-eye coordination improves. Small round tips (sizes 1-3) are perfect for delicate work like baby bottle nipples or teddy bear eyes.
The wet-on-wet technique involves piping details onto icing that hasn’t fully dried, allowing colors to blend beautifully. Drop contrasting icing onto wet icing, then drag a toothpick through for marbled effects.
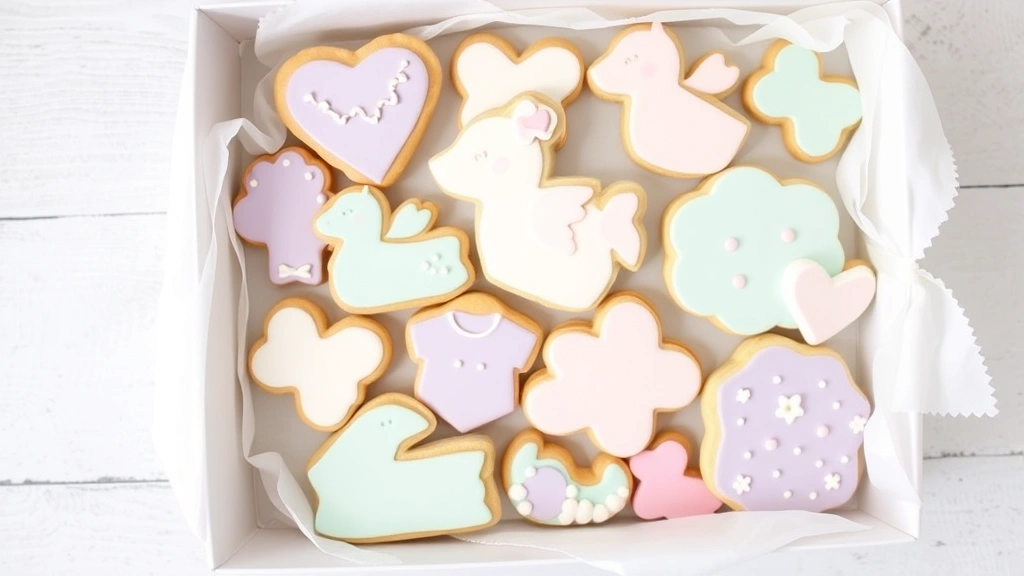
Baby Shower Design Ideas
Your baby shower cookies should reflect the celebration’s theme. Consider these popular design concepts:
Classic Baby Motifs: Onesies with monograms, baby bottles with custom names, pacifiers with polka dots, and strollers with intricate wheels. These timeless designs appeal to all guests and photograph beautifully.
Gender-Specific Themes: For baby boy clothes-inspired showers, consider sailboats, little gentleman themes, or sports motifs. For baby girl clothes-inspired celebrations, tutus, crowns, and floral patterns work wonderfully. Check out our guides on baby boy clothes and baby girl clothes for theme inspiration that translates beautifully to cookie designs.
Neutral and Modern: Geometric patterns, minimalist designs, and botanical elements appeal to contemporary parents. Think hexagons, watercolor effects, and delicate leaf patterns.
Character and Storybook: If the parents have favorite children’s books, create cookies inspired by those characters. This personal touch makes cookies extra special.
Interactive Elements: Consider cookies guests can personalize themselves with edible markers, or create a “cookie decorating station” as part of your shower activities. This adds entertainment value and creates lasting memories.
Gradient and Ombre Effects: Layer slightly different shades of the same color for sophisticated, modern-looking cookies. This technique is easier than it appears and always impresses.
Color Coordination and Themes
Color choice sets the tone for your entire cookie display. When selecting your palette, consider the best baby shower gifts and decorations already planned, ensuring cookies coordinate beautifully.
Popular color combinations: Soft pastels (pale pink, mint, lavender, pale yellow) create a gentle, traditional feel. Jewel tones (emerald, sapphire, gold) offer sophistication. Neutrals (gray, ivory, soft gold) provide versatility. Bright primaries (red, blue, yellow) work for playful, modern showers.
Use gel food coloring rather than liquid—it won’t thin your icing. Start with small amounts; you can always add more, but removing color is impossible. Mix colors thoroughly to avoid streaks. White icing with colored outlines creates clean, professional-looking designs.
Consider your venue’s lighting when choosing colors. Soft colors photograph beautifully in natural light but may appear washed out under harsh fluorescents. Test your colors in your shower’s actual lighting if possible.
Create a cohesive look by limiting your palette to three main colors plus white. This restraint actually makes designs more striking than using every color available. Consistency across your cookie display creates the impression of professional bakery work.
Storage and Transport Tips
Proper storage preserves your beautiful work and ensures cookies taste fresh at your event. Store completely cooled and decorated cookies in airtight containers at room temperature for up to one week. Layer cookies between parchment paper to prevent icing transfer.
For transporting decorated cookies, use sturdy boxes lined with parchment paper. Place cookies in a single layer if possible, or layer them with thick cardboard dividers. Avoid stacking decorated cookies directly on each other. Use a cooler with ice packs if transporting in hot weather—heat can soften icing and cause colors to run.
If making cookies several days before your shower, store unfrosted cookies in airtight containers for up to five days. Decorate them closer to the event for the freshest appearance. Royal icing can actually improve with time as it hardens to a beautiful shine.
For guests taking cookies home, provide small treat boxes or bags. Include a note about storage: “Best enjoyed within 3 days. Store in an airtight container at room temperature.” This ensures everyone enjoys your cookies at peak quality.
If you’re preparing cookies for a destination event or mailing them to family, freeze unfrosted cookies in airtight containers for up to three months. Thaw at room temperature before decorating, or decorate before freezing if you prefer. Royal icing-decorated cookies freeze beautifully.
Frequently Asked Questions
Can I make baby shower cookies ahead of time?
Absolutely! Bake cookies up to one week in advance and store them unfrosted in airtight containers. Decorate them 2-3 days before your shower for the freshest appearance. Royal icing actually hardens beautifully over time, creating a professional-looking finish.
What’s the best way to avoid air bubbles in royal icing?
Let your mixed icing sit for 10 minutes before using it. Tap piping bags gently on the counter to release trapped air. When flooding, work slowly and use a toothpick to pop any bubbles that appear on the surface before the icing dries.
Can I use buttercream instead of royal icing?
You can, though royal icing is superior for decorated cookies because it dries hard and travels well. If using buttercream, refrigerate decorated cookies until serving time, as buttercream softens at room temperature. Buttercream also requires careful handling to avoid smudging.
How do I fix mistakes in royal icing?
If you make a piping mistake before icing dries, quickly wipe it away with a damp toothpick or small brush. For dried icing mistakes, carefully scrape away the error with a small knife and re-pipe the section. No one will notice the repair on a finished cookie!
What if my icing is too thick or too thin?
Icing too thick? Add water one drop at a time until you reach desired consistency. Too thin? Mix in additional powdered sugar gradually. Keep a small bowl of powdered sugar and water nearby while decorating to make quick adjustments.
Can I use food coloring alternatives?
Yes! Natural alternatives like beet juice (pink), spinach juice (green), and turmeric (yellow) work, though they’re less vibrant. For detailed work requiring precise colors, gel food coloring is most reliable and won’t affect icing consistency.
How should I decorate if I’m not artistic?
Simple designs are often the most elegant! Try polka dots, stripes, or solid color flooding with minimal details. Use edible markers for simple faces on teddy bears. Practice piping on parchment paper first. Many “mistakes” look charming and add character to homemade cookies.
What’s the ideal thickness for sugar cookies?
Roll dough to 1/4-inch thickness for cookies that hold up to decorating without being too thick or cake-like. Use a ruler or thickness guides on your rolling pin to ensure consistency. Uniform thickness means even baking and a professional appearance.
Can I make a double batch?
Definitely! This recipe doubles easily. Just ensure you have adequate refrigeration space and enough oven capacity to bake all cookies. Double batches are actually more efficient—you’ll spend less time per cookie creating a larger display.
How do I coordinate cookies with other shower elements?
Review your Parent Path Daily Blog for comprehensive shower planning ideas. Ensure cookie colors match your invitations and decorations. If you’re gifting cookies alongside best baby shower gifts, coordinate packaging for a cohesive presentation. Consider the parents’ personal style—their home décor often hints at their color preferences.
For parents expecting soon, check out our parenting advice guide for thoughtful touches that show you’re thinking about their upcoming journey. And for those celebrating with new dads, our essential tips for new dads offers additional celebration inspiration.
Final Thoughts on DIY Baby Shower Cookies
Creating beautiful baby shower cookies at home transforms your celebration into something truly special. These treats represent thoughtfulness, creativity, and effort—qualities that resonate with shower guests far more than store-bought alternatives ever could. Start with quality ingredients, invest in basic decorating tools, and practice your techniques on parchment paper before tackling your final cookies.
Remember that imperfections add charm to homemade treats. Guests appreciate the love and time invested in creating something unique for their celebration. Whether you’re creating elegant designs or whimsical creations, your baby shower cookies will be treasured as edible memories of this special milestone.
Begin planning your cookie designs now, gather your supplies, and enjoy the creative process. Your guests—and the parents-to-be—will remember the care you put into every delicious, beautifully decorated cookie.